JBlueLineME - Mobile Edition
User Manual
Contents
- Viewing A Method
- Choosing A Method
- Ringing A Method
- Place Notation Editor
- Setting Up The Calls
- Setting Personal Preferences
- Changing The Appearance
Viewing A Method
There are three views of a method available for the user to select.
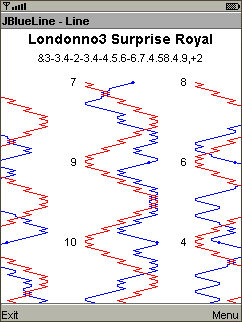
- The 'line view' shows the blue line without numbers, providing a compact way to see the plain course.
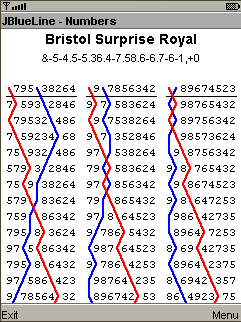
- The 'numbers view' shows the plain course written out as rows of numbers.
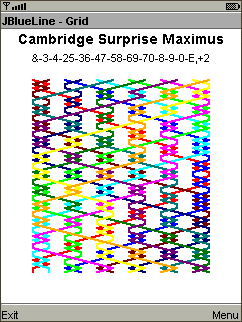
- The 'grid view' shows a single lead with all bell traces overlaid, so that the interaction of bells can be seen.
Operations
You may perform three operations in both the 'line' and 'grid' views, 'pan', 'zoom in' and 'zoom out'. In the 'numbers' view only panning is available since the choice of font size is too limited to provide a 'zoom' function. In order to pan around the method, press the appropriate cursor key for the direction to move in. Note this may seem counter intuitive if the method fits entirely on the screen! Panning is only required for methods that do not fit, and then it is entirely intuitive. Try it, you'll see what I mean.
Navigation
Selection of the views can be done in two ways. There is an application menu with a list of items to select from, allowing navigation of the entire application. Additionally, some of the numbered keys have been given functions too.
| Key | Function |
|---|---|
| 1 | Line View |
| 2 | Numbers View |
| 3 | Grid View |
| 5 | Zoom In |
| 8 | Zoom Out |
|
|
[Contents]
Choosing A Method
There are 72 separate method collections in the MicroSIRIL library collection. The largest collection of methods by far is the Surprise Major set. It is so large that it exceeds the maximum allowable resource file size of 64 kB, and causes the software to crash on some devices. Hence you will notice that the Surprise Major method collection has been divided into three (almost equal) chunks for the purpose of searching. These libraries are derived from the original produced and maintained by the Central Council Methods Committee, but with that single alteration for the Surprise Major collection. In order to enable the software to search libraries at all on mobile phones, it is necessary for the libraries to be part of the installation JAR file. This means the libraries may not be up to date, but I will try to ensure the most recent are built into the JAR file. Finally, there is a way to provide the most up to date method libraries, which will work in certain circumstances described in that section.
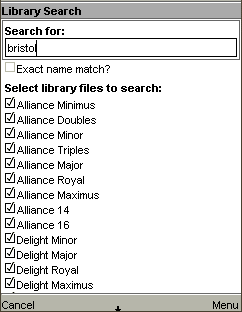
To search for a method, enter part of the name to be matched against all the method name entries. The search term can be a little awkward. Remember you are searching the libraries as they are distributed in mslibs.zip. So searching for "bristol" (non-extact match) will find about 19 methods, including "Bristolbob Doubles", "Bristolish Surprise Minor" etc. You will note the method names are as they appear in the text files that consitute mslibs.zip. That means that in order to search for "Plain Bob Doubles", you need a search term like "plain". Terms like "bob" match too many methods, and the displayed list is truncated at 30 items.
Then select the subset of the method collections to be searched (there are now 74 of them after splitting the Surprise Major collection). You may find it more convenient to keep all the method collections selected, as choosing individual collections from 74 items can take a while. You can also select or deselect all collections from a pair of menu items. This will significantly speed up the selection of a single collection if you start by deselecting all collections and then choosing the one you want. Finally, from the menu select the "Search" item.
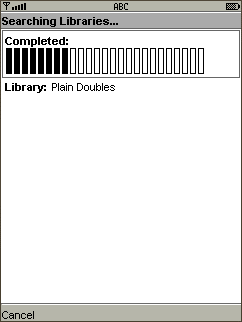
The display will change to show the search progress and the current collection being searched. You may cancel the search at any time, you will be returned to the last method view. Should your phone ring during a search operation, it will be cancelled so that your processor is not preoccupied during your conversation.
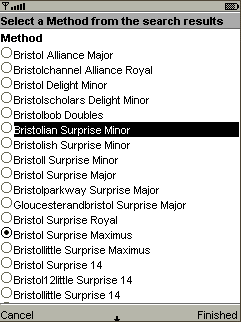
Finally, the (up to) first 30 matches will be displayed in a list. If the required method is not present and you are sure it exists, your search may not have been specific enough. Try a longer search string, or choose a smaller subset of method collections to be searched. (If you want or need to search for an exact method name match, there is an option you can set in the search criteria for a more restrictive search.) From this list you may select the method that you wish to view, and "select" it. After the first search, a new menu item appears that allows you to select another method from the same search results.
On completion, the calls for the new method will be inferred from the limited number of situations that can be (relatively) safely applied. You may edit the calls for those situations where they are not correctly inferred, or where they are not inferred at all.
[Contents]
Ringing A Method
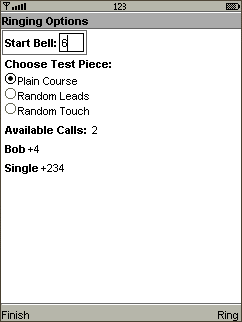
Select the 'Ring' option from the menu when viewing a method in order to start a simulated ringing session. You should choose the bell you wish to start from and the test piece from the three options:
- Plain Course - On completion of a whole course ringing stops. A very useful first step to learning a method.
- Random Leads - At the end of each lead ringing stops. you only find out which lead you will ring when you press the up cursor to start. A perfect second step to proving you know a method well. In general you do not know a method properly if you do not know your place bells. (But probably over the top for Plain Bob Doubles). Hence, help is at hand.
- Random Touch - An infinitely long touch, stop when you've had enough if you are not already addicted. Make sure the call definitions are correct before starting.
Notice the screen displays the defined calls. This should remind you to check they are correctly defined before ringing a random touch. (If you only want to ring Plain Bob Doubles, they are correct by default - promise - no need to learn about place notation. Phew!)
There are other preferences that you might like to amend to suit your needs, available from the preference menu. Such options include the length of time allowed before an additional fault is added to your score, whether your device should vibrate on a fault and the frequency of calls. These options tend not to change as often, so are place in the preference menu with the other options.
Keys
Before commencing ringing:
| Key | Function |
|---|---|
| 0 | Select bell number 10 |
| 1 - 9 | Select that bell number |
| * | Select bell number 11 |
| # | Select bell number 12 |
16 bell ringers are rather a minority concern here, so you will have to manually select your start bell on the previous screen if you want bells 13-16.
During ringing:
| Key | Function |
|---|---|
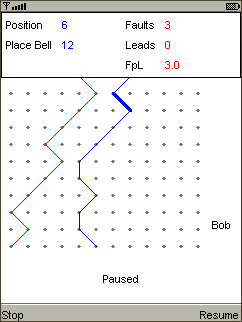
| Up Cursor | Pause / Resume ringing (or cheat and have a quick look at the line) |
| Left Cursor or 1 | Move the bell down a place for the next change |
| Down Cursor or 2 | Make a place |
| Right Cursor or 3 | Move the bell up a place for the next change |
| OK / Enter / Fire | Restart (keys in previous table now work again) |
| 5 | Next random lead (only when ringing random leads) |
As you ring, the application checks your answers for you. This saves manual checking against a paper copy and potentially not noticing a mis-match. When you do make a mistake, this is flagged up to you by making the line width drawn for the change thicker. You will also accumulate faults in your score at the top of the screen. These statistics are for you personal use only, and to nag your conscience. Do you really know that method well enough to grab a rope? Where those mistakes really finger problems or did you actually supply the wrong answer. Your call!
If you are too slow to provide the correct answer, you will accumulate additional faults. This intended to add a little realism to the simulator, as in the real world being too slow has a drastic effect on the ringing. But in the real world you will not get as much as 5 seconds to supply the correct answer! (A user configurable setting.) In reality, if you know that the timer added a fault because you were legitimately distracted by sipping your pint in the pub, then just ignore the additional fault. You can continue to ring inspite of it. Its just a bit of fun!
If you are using a Blackberry Storm 2 device, please see additional advice.
[Contents]
Place Notation Editor
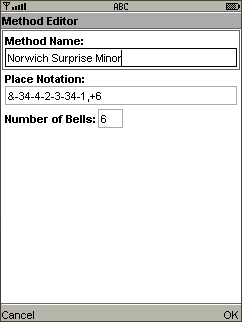
If you want to edit the place notation describing the method, but you are not sure how, you can read up on
what you need to know in
 "Understanding Place Notation".
You may need to do this if you wish to ring a touch of a method and you need to define the calls.
"Understanding Place Notation".
You may need to do this if you wish to ring a touch of a method and you need to define the calls.
You need to enter three pieces of information:
- The method name.
- The place notation for a lead of the method, using the same syntax as MicroSIRIL. (Think carefully when entering the notation for a lead of Original...)
- The number of bells for which the method is defined. This is not always discernable from the place notation, as external places need not be entered.
On completion, the calls for the new method will be infered from the limited number of situations that can be (relatively) safely applied.
[Contents]
Setting Up The Calls
The library used to extract methods does not define the calls used in that method. Besides, you may expect any definition or convention to be overruled by rebellious ringers preferring the likes of Kent, Oxford and Bristol (and other extending lead methods) to have 4ths place bobs instead of (n-2)ths place bobs as might have been chosen by default!
As a result, this software will create calls for any retrieved library method only where they can be (reasonably) safely inferred. These 'default' calls ignore exceptions (or modern convention) and as a result any methods that are deemed to be better having 'extending leads' at calls will get the wrong calls inferred. Prime examples are Kent, Oxford and Bristol (on any number of bells), others include Belfast, and there's always Glasgow S. Major for total confusion (where the conductor may choose either 4ths place or 6ths place bobs with equal probability).
If you wish to ring a random touch, you will have to ensure that the calls are defined correctly yourself. The following table provides a guide to some common methods and their calls, or indicates what the software should infer.
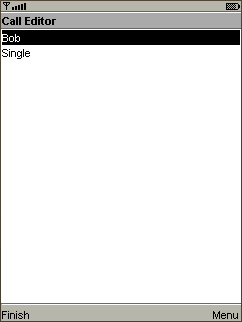
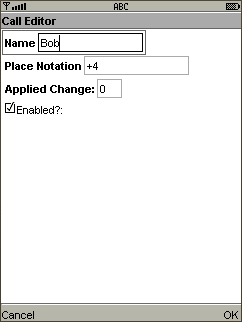
To edit the calls, select the "Edit calls" menu item. You will be present with a list of calls for that method. Select the call to be edited and a new screen will be displayed with various fields to be amended as follows:
- Name - e.g. 'Bob' or 'Single'
- Place notation - see the table below
- Applied change - this is relative to the lead head at change zero. So -1 here means the call takes effect at the change immediately before the leadhead, as in Grandsire.
- Enabled - you may have a call defined, but disabled for the purposes of ringing a touch. E.g. you may not want to ring singles in a touch.
You may also select a call to be deleted, or request to add a call. Adding a call uses the same definition as above. When you select Kent or Oxford from the library, you will want to delete or disable the inferred "Single"!
| Method | Inferred | Bob | Single |
|---|---|---|---|
| Format: 'place notation' at 'applied change' ** | |||
| Grandsire | No | +3 at -1 | +3.23 at -1 |
| Erin Triples | No | +5 at 1 | +56 at 1 |
| Stedman Doubles | No | Two of them as the library defines a pair of sixes | |
| none | +4 at 0 | ||
| none | +34 at 6 | ||
| Stedman Triples | No | Two of them as the library defines a pair of sixes | |
| +5 at 3 | +56 at 3 | ||
| +5 at 9 | +56 at 9 | ||
| Stedman Caters | No | Two of them as the library defines a pair of sixes | |
| +7 at 3 | +78 at 3 | ||
| +7 at 9 | +78 at 9 | ||
| All 2nds place methods Covers the majority of 'usual' methods. | Yes | +4 at 0 | +234 at 0 |
| All even bell nths place methods | Yes | +(n-2) at 0 | +(n-2)(n-1) at 0 |
| e.g. Double Norwich CB Major | Yes | +6 | +67 at 0 |
| e.g. Bristol S Major | Incorrectly inferred as | +6 | +67 at 0 |
| e.g. Bristol S Major | Should be (by modern convention) | +4 | +234 at 0 |
** This makes more sense with the Call Editor open.
See
"Bobs and Singles" for details
on how the types of calls are inferred. This method does not work for Grandsire or Stedman. Indeed, a method can
use any calls it likes, hence the given convention does not always work.
[Contents]
Setting Personal Preferences
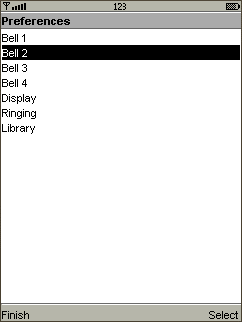
You may trace the paths of up to four bells. Each bell has its own options detailed below, and may be enabled or disabled according to requirements. This should cover the need for a handbell pair plus treble with one trace to spare. You may alter the appearances of both the 'line' and 'number' displays, including the 'aspect ratio' of the method drawn. This is the ratio of X:Y drawing units, and is chosen by default to a value that looks good to me for that method collection. You may alter that value if you prefer otherwise, and the value is stored for the next time you view a method from that collection. For methods that are manually entered, the method name is parsed to infer the collection, and if that fails, there is a separate default value for 'everything else'.
The 'Library' option only appears if you have installed the 'fileconn' version of the software (as opposed to the 'standard' version), and your Java installation supports an optional package. If it is missing, skip this paragraph. The optional package provides support for reading files from outside the application. It usually only supports reading files from secondary memory cards, e.g. an SD card in your PDA. The support is useful if you want the most up to date libraries available for method searching, but you will need to install those libraries as follows.
- Download the libraries (mslibs.zip) to your computer.
 Unzip them to a single directory.
- Copy them to your secondary memory card.
- Select the "Library" preference settings.
- Navigate to the location for your libraries and select that directory.
Note that you may be asked for permission for the application to access the file system each time you search for a method. When you get fed up with that request (for each of the 72 library collections), you might like to investigate how your Java Virtual Machine implementation allows you to set default permissions for the JBlueLineME application. Note the application is only reading your file system, not writing to it, so you cannot corrupt your device's installation. And personal details cannot be leaked out over the air, as that also requires a separate permission from you for the application. (The application will never ask for OTA transmission, as it has not been coded in.) You may return to using the libraries installed with the application at any time. You need to use the same directory navigation, but instead select the first root item, "Internal Library".
[Contents]
Changing The Appearance
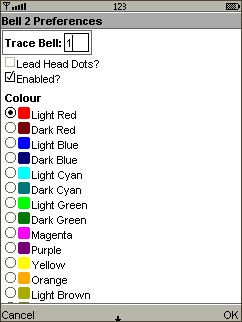
When viewing a method, you may choose to alter the following aspects:
- The bell number to be traced.
- Should dots be drawn at the lead ends / heads?
- Should the bell be traced at all? (Enable / disable)
- The colour the line will be drawn in.
On completion of your selections, you will return to the preference menu so that other aspects can be changed.
[Contents]